
How to Root Find X3 Neo Phone: Through this article, I will tell you how to root the Find X3 Neo phone. We will use Magisk Manager, SuperSU, and KingoRoot app applications to root the Find X3 Neo phone. This process will be very simple and easy.

Through this article, I will tell you five ways to root phone it. Before starting this process, let me warn you that if your mobile phone gets damaged during this process, I will not take any responsibility. Do this process at your own risk. Here you will not be told any wrong procedure and step
Why You Should Root Your Find X3 Neo Device
- Why You Should Root Your Find X3 Neo Device
- What do you mean by rooting
- Do this before rooting your Find X3 Neo phone
- Unlock the Bootloader On the Find X3 Neo Device
- Install TWRP Recovery On the Find X3 Neo Device
- Download Pre-Requirement File
- Method 01: Root Find X3 Neo by Magisk zip file
- Method 02: Root Find X3 Neo by SuperSU Zip
- Check root on the Find X3 Neo device
- Conclusion
Most people do not root their Find X3 Neo phones because they are either afraid of voiding the warranty or do not know how to root an Find X3 Neo phone. Rooting your Find X3 Neo phone can give you a lot of benefits and make your phone work better.
- Customization
- Removal of bloatware
- Access to root-only apps
- Tethering and network control
- Backup and recovery
- Increase the battery life
- Increase the performance
What do you mean by rooting
Rooting an Find X3 Neo phone, in simple terms, means gaining administrative or superuser access to the Android operating system on the device. It’s somewhat similar to jailbreaking on iOS devices.
When you root an Android phone, you are essentially removing the limitations imposed by the device manufacturer and the mobile carrier, which allows you to have more control and access to the device’s software and hardware.
Benefits of rooting the Find X3 Neo Phone
Rooting the Find X3 Neo phone gives many benefits, which included
- Customization and personalization
- Removal of bloatware
- Performance optimization
- Advanced app management
- Ad-blocking and Privacy
- Wi-Fi and Tethering Tweaks
- Exclusive App and Modifications
Drawbacks and Risks of Rooting Find X3 Neo Phone
Rooting any Find X3 Neo mobile gives many benefits but there is some danger in it, here are some results of rooting the mobile device.
- Warranty Void
- Security Risks
- Software Updates
- Bricking the Device
- Loss of over-the-air (OTA) updates
- Limited App Compatibility
- Increased Risk Of Malware
Disclaimer for Find X3 Neo phone
We have to keep in mind that rooting an Find X3 Neo device carries some risk which will potentially void your device’s warranty and can also lead to data theft and root access can be misused to destroy your device To root an Find X3 Neo device, we have to understand and follow its guideline and be careful while making any system changes in your android device.
Important guide before rooting Find X3 Neo phone
Before rooting your Find X3 Neo phone, it’s crucial to follow some important guidelines to ensure a smooth and successful rooting process.
- Research and Understand the Process
- Backup Your Data
- Charge Your Phone
- Unlock Bootloader
- Enable USB Debugging
- Find Reliable Resources
- Use Trusted Rooting Tools
- Follow Step-by-Step Instructions
- Understand the Risks
- Be Cautious with Modifications
Do this before rooting your Find X3 Neo phone
Before rooting your Find X3 Neo device, there are a few things you need to do in order to make the process as smooth and successful as possible.
- Make sure to Unlock the Bootloader On the Find X3 Neo Device. This step is essential; without unlocking, you cannot Root your Find X3 Neo phone.
- You need to Install TWRP Recovery On the Find X3 Neo Device.
- Before Rooting, make sure that your Find X3 Neo Device has more than 75% of Battery available.
- Make sure to Take a complete backup of your Find X3 Neo Android phone. Having a backup will help you restore important files and software if you lose them.
- This method and step is only for the Find X3 Neo Device smartphone. Please do not try this method and step on any other smartphone. Otherwise, it will Brick your phone.
Unlock the Bootloader On the Find X3 Neo Device
Step 1: Enabling Developer Options and OEM Unlock
Before we dive into the unlocking process, you need to enable Developer Options on your Find X3 Neo. Follow these steps:
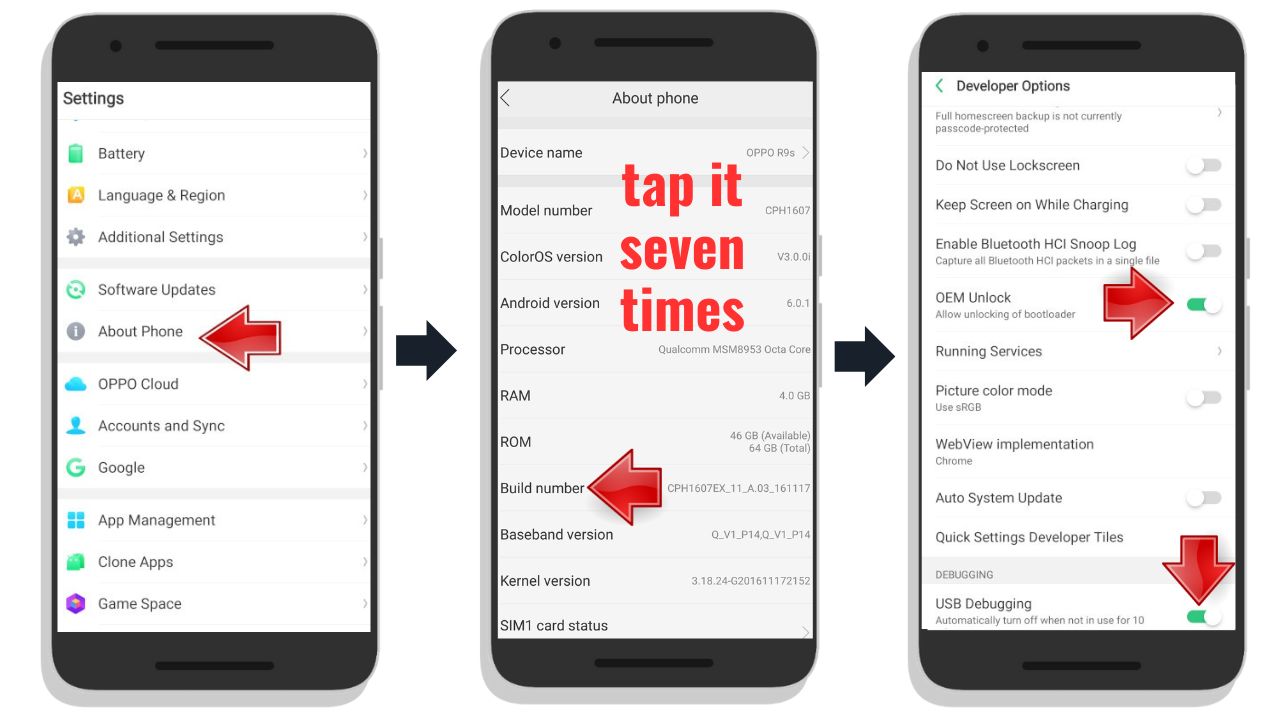
- Open the Settings on your Find X3 Neo smartphone
- Scroll down and find About Phone Tap on it
- Look for Build Number and tap it seven times until you see a message indicating that the Developer Option has been enabled.
- Return to the main Settings menu, and then scroll down to Additional Settings.
- Tap on Developer Options
- Inside Developer Options and OEM Unlocking enable
- After enabling OEM Unlocking, also enable “USB Debugging.”
Step 2: Unlocking the Bootloader on Find X3 Neo
Now that you’ve enabled the necessary developer options, it’s time to proceed with unlocking the bootloader:
- Start by downloading and installing the Find X3 Neo USB drivers if you haven’t already (make sure you have completed the pre-requisites section).
- Connect your Find X3 Neo to your PC using the original USB cable.
- Completely power off your smartphone.
Next, follow these steps to enter the bootloader mode:
- Extract the ADB & Fastboot folder to a convenient location on your PC.
- Right-click anywhere in the blank space within the folder while holding the Shift key to open a command window or PowerShell window.
In the command window, execute the following commands:
- To verify whether your smartphone is detected by the computer, type and run the command: adb device
- To enter bootloader mode, type and run the command: adb reboot bootloader
Now, you are ready to unlock the bootloader. Depending on your device, you can use one of the following commands. If the first command does not work, try the second time:
- To unlock the bootloader, type and run the command: fastboot flashing unlock or fastboot OEM Unlock
After running the appropriate command, you will receive a confirmation message. Proceed by typing “Yes” and pressing Enter to unlock the bootloader.
- Finally, reboot your Find X3 Neo to allow it to enter the unlocked bootloader state by typing and running the command: fastboot reboot
Congratulations You have successfully unlocked the bootloader on your Find X3 Neo phone.
Install TWRP Recovery On the Find X3 Neo Device
Are you looking to install TWRP Recovery on your Find X3 Neo device to unlock its full potential and enhance your Android experience? In this step-by-step guide, we will walk you through the process, ensuring a hassle-free installation.
Step 1: Prepare Your Computer
Start by downloading the SDK Platform Tool on your computer, and make sure it’s up and running. Additionally, download the Find X3 Neo device TWRP Recovery file. Once you have these, follow these steps:
- Open the SDK Platform Tool on your computer
- Move the Find X3 Neo device TWRP Recovery file into the SDK Platform Tool folder
- Rename the TWRP Recovery file to “twrp.img”
Step 2: Open the Command Prompt option
Now, it’s time to open the Command Prompt in the SDK Platform Tool folder. You have two options to do this:
Option 1:
- Press the Shift key + Right Mouse Button in an empty space within the SDK Platform Tool folder
- Select “Open command window here.” This will open the Command Prompt on your computer.
Option 2:
Alternatively, you can open the Command Prompt by typing “CMD” in the address bar of the SDK Platform Tool folder.
Step 3: Boot Your Find X3 Neo into Fastboot Mode
Now, it’s time to boot your Find X3 Neo into Fastboot mode:
- Turn off your phone completely.
- Press and hold the Power button and the Volume Up button simultaneously for 3-5 seconds. Your phone will boot into Fastboot Mode.
Step 4: Enter Commands
With your Find X3 Neo in Fastboot Mode, you are ready to enter the necessary commands on your computer. Please type each command accurately:
- Type command: adb reboot bootloader and Press Enter, Once the Find X3 Neo has booted into quick boot mode, type in the command window
- Type command: fastboot devices and, Once you enter this command it will execute the Find X3 Neo device. after entering the command press enter to execute the command.
- Type command: fastboot flash recovery twrp.img and Press Enter. “This command will start installing TWRP recovery on the Find X3 Neo device.”
- Type command: fastboot reboot and Press Enter. You should now have successfully installed TWRP recovery on your Find X3 Neo device
 Step 5: Verify TWRP Recovery Installation
After successfully executing these commands, you will have installed TWRP Recovery on your Find X3 Neo. To confirm the installation, simply boot your phone into recovery mode.
- On your Find X3 Neo, press the necessary key combination (usually the Power button + Volume Up button) to enter TWRP Recovery mode.
Congratulations! You’ve successfully installed TWRP Recovery on your Find X3 Neo, opening up a world of possibilities for customization and advanced Android management
Download Pre-Requirement File
| Details | File link |
| Find X3 Neo USB drivers | Download |
| SDK Platform Tool | Download |
| TWRP Recovery file | Download |
| Magisk Manager | Download |
| SuperSU flash file | Download |
Method 01: Root Find X3 Neo by Magisk zip file
Unlock the full potential of your Find X3 Neo by rooting it with TWRP and Magisk Manager. This comprehensive guide will walk you through the process, ensuring a successful root. Let’s get started!
Step 1: Prepare Your Phone and Download Magisk Manager
Start by downloading the Magisk Manager flash file and moving it to your phone’s internal storage.
Step 2: Boot Your Phone into TWRP Recovery Mode
To root your Find X3 Neo, you need to boot it into TWRP Recovery Mode. Follow these steps:
- Power off your phone completely.
- Press and hold the Power button and Volume Down button simultaneously for 3-5 seconds. Your phone will boot into TWRP Recovery Mode.
Step 3: Wipe Data
Once in recovery mode, follow these steps to wipe your data:
- Inside TWRP, tap on “Wipe.”
- Select “Advanced wipe.”
- Choose “Dalvik Cache,” “Cache,” “System,” and “Data” by ticking the boxes next to them.
- Slide the “Swipe to Wipe” slider to initiate the data wipe process.
Step 4: Flash Magisk Manager
Now that your data is wiped, you can proceed to flash Magisk Manager:
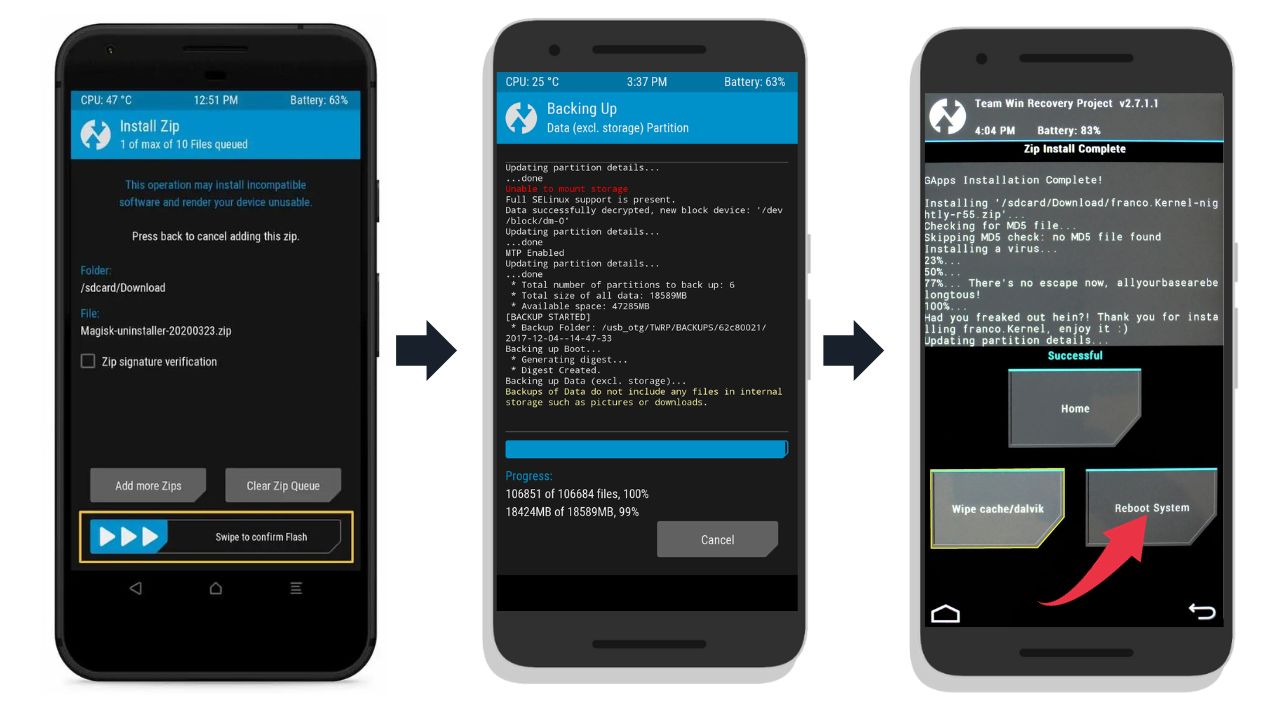
- Inside TWRP, tap on “Install.”
- Select the Magisk Manager flash file from your phone’s internal storage.
- Slide the “Swipe to Confirm Flash” slider to begin the installation process.
 Step 5: Reboot Your Phone
After successfully flashing Magisk Manager, it’s time to reboot your Find X3 Neo.
- Tap on “Reboot” and select “System.”
Congratulations! Your Find X3 Neo is now rooted, giving you access to advanced features and customization options.
Method 02: Root Find X3 Neo by SuperSU Zip
Are you ready to unlock the full potential of your Find X3 Neo device by rooting it with SuperSU? This guide will walk you through the process, ensuring a successful and secure root. Let’s get started
Step 1: Prepare Your Phone and SuperSU File
Begin by downloading the SuperSU flash file and moving it to your phone’s internal storage.
Step 2: Boot Your Phone into TWRP Recovery Mode
To root your Find X3 Neo device, you need to boot it into TWRP Recovery Mode. Follow these steps:
- Power off your phone completely.
- Press and hold the Power button and Volume Down button simultaneously for 3-5 seconds. Your phone will boot into TWRP Recovery Mode.
Step 3: Flash SuperSU
Now that you’re in TWRP Recovery Mode, follow these steps to flash SuperSU:
- Inside TWRP, tap on “Install.”
- Select the SuperSU flash file from your phone’s internal storage.
- Swipe the “Swipe to Confirm Flash” slider to begin the installation process.
 Step 4: Reboot Your Phone
After successfully flashing SuperSU, it’s time to reboot your Find X3 Neo device.
- Tap on “Reboot” and select “System.”
Congratulations! Your Find X3 Neo is now rooted, giving you the freedom to customize and enhance your Android experience
Check root on the Find X3 Neo device
Step 1: Download and Install Root Checker
Begin by downloading the Root Checker application from the Google Play Store:
- Open the Play Store on your Find X3 Neo.
- Search for “Root Checker” in the Google search bar.
- Find the Root Checker app and click “Install” to download and install it on your device.
Step 2: Verify Root Access
Once the Root Checker app is installed, it’s time to verify your root access:
- Open the Root Checker app on your Find X3 Neo.
- Inside the app, locate and tap on the “Verify” button.
- The app will request permission for verification. Grant the necessary permission to proceed.
- After granting permission, you should see a message that says, “[Congratulations! Root Access is properly installed on this device].”
 Conclusion
 Conclusion
There are many ways to root an Find X3 Neo phone, but the easiest way is to use a rooting app. There are many processes that can be used but they are a bit difficult and none work that much better overall this is the easiest way to root Find X3 Neo phone
Thank you for visiting androidcharge.com. We look forward to mentioning the desired outcome or engagement and being a valuable resource for you.