
How to Root 12 Pro+: Through this article, I will tell you how to root the 12 Pro+. We will use and Download Magisk Manager, SuperSU, and KingoRoot app applications to root the 12 Pro+. This process will be very simple and easy.
What do you mean by rooting Android?
- What do you mean by rooting Android?
- Benefits of rooting the 12 Pro+ mobile
- Drawbacks and Risks of Rooting 12 Pro+ Mobiles
- Disclaimer for 12 Pro+ Device phone
- Important guide before rooting 12 Pro+ phone
- How to root 12 Pro+ mobile without a computer
- How to convert a 12 Pro+ phone into a rooted device
- How to root 12 Pro+ step-by-step
- Conclusion
Benefits of rooting the 12 Pro+ mobile
Rooting the 12 Pro+ phone gives many benefits, which these benefits are included
- Customization and personalization
- Removal of bloatware
- Performance optimization
- Advanced app management
- Ad-blocking and Privacy
- Wi-Fi and Tethering Tweaks
- Exclusive App and Modifications
Drawbacks and Risks of Rooting 12 Pro+ Mobiles
Rooting any 12 Pro+ mobile gives many benefits but there is some danger in it, here are some results of rooting the mobile device.
- Warranty Void
- Security Risks
- Software Updates
- Bricking the Device
- Loss of over-the-air (OTA) updates
- Limited App Compatibility
- Increased Risk Of Malware
Disclaimer for 12 Pro+ Device phone
We have to keep in mind that rooting a 12 Pro+ device carries some risk which will potentially void your device’s warranty and can also lead to data theft and root access can be misused to destroy your device To root a 12 Pro+ device, we have to understand and follow its guideline and be careful while making any system changes in your android device.
Important guide before rooting 12 Pro+ phone
Before rooting your 12 Pro+ phone, following some important guidelines is crucial to ensure a smooth and successful rooting process.
- Research and Understand the Process
- Backup Your Data
- Charge Your Phone
- Unlock Bootloader
- Enable USB Debugging
- Find Reliable Resources
- Use Trusted Rooting Tools
- Follow Step-by-Step Instructions
- Understand the Risks
- Be Cautious with Modifications
How to root 12 Pro+ mobile without a computer
Rooting a 12 Pro+ mobile device without a computer usually involves using a rooting app or APK directly on the device. Here is a general guide on how to root 12 Pro+ mobile without a computer:
- enable unknown sources
- download rooting app
- install rooting app
- launch rooting app
- Root your 12 Pro+ phone
- verify root access
Please note that the specific steps and rooting apps may vary depending on your 12 Pro+ phone model and the operating system it runs. To eliminate any potential danger, follow the instructions and use trusted rooting apps
How to convert a 12 Pro+ phone into a rooted device
The easiest way to root a 12 Pro+ phone is to use a reliable one-click root tool. Here’s a general step-by-step guide:
Step1.
- first of all, check root in 12 Pro+ phone
- Open the settings on the 12 Pro+ phone
- Go to About Phone, then click on Baseband Versions and copy the number
- Go to Google search and paste and text stock Rom Download (download magisk zip File)
- After unzipping the file two files will be shown
- After that install Magisk, after that, you have to open the app, and it will show on the screen, click on Magisk Install.
- After that click on patch vbmeta in boot image then select the file boot.img done

Step2.
- After that transfer the downloaded file to the second device (Patch, vb meta)
- Have to move the file out of the download section (Patch, vb meta)
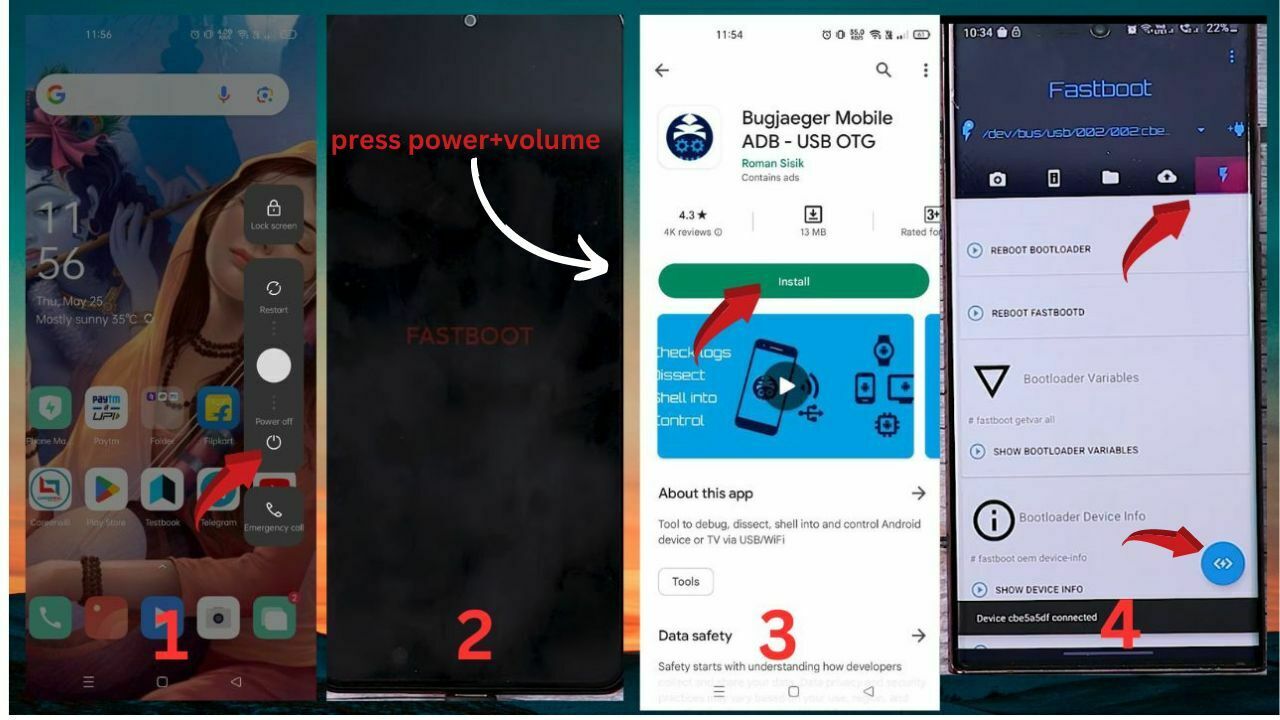
- Bugjagger Mobile ADB-USB OTG app has to be installed in the Second Device
- Switch off the rooting device, then after pressing the power + volume button, it will open, after that connect both mobiles to OTG.
- Second device bugjagger mobile adb – usb otg app open then slide option then click on last option and click on popup as shown below
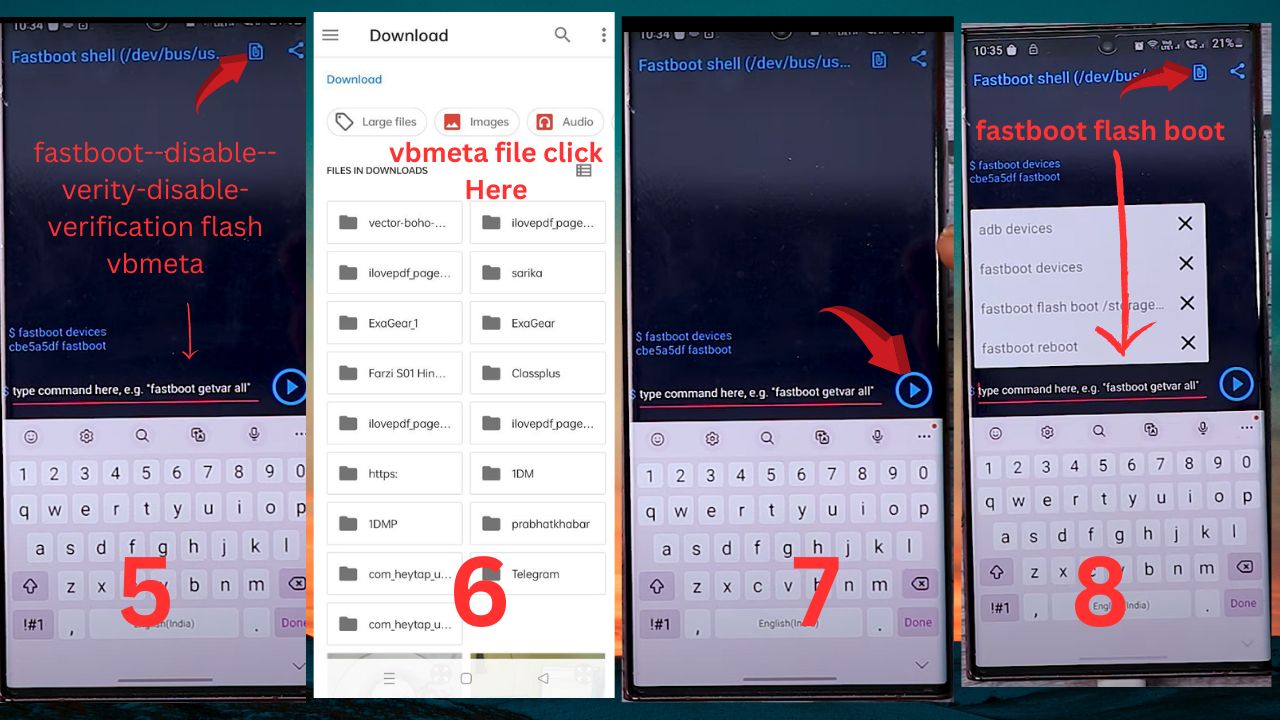
- After opening the second device type this command-fastboot–disable–verity-disable-verification flash vbmeta The file manager will open after clicking on the top side
- After clicking on the vb meta file, click on the play bottom icon on the screen After that the command panel will open again then fastboot flash boot will have to be typed Click on the attached one above
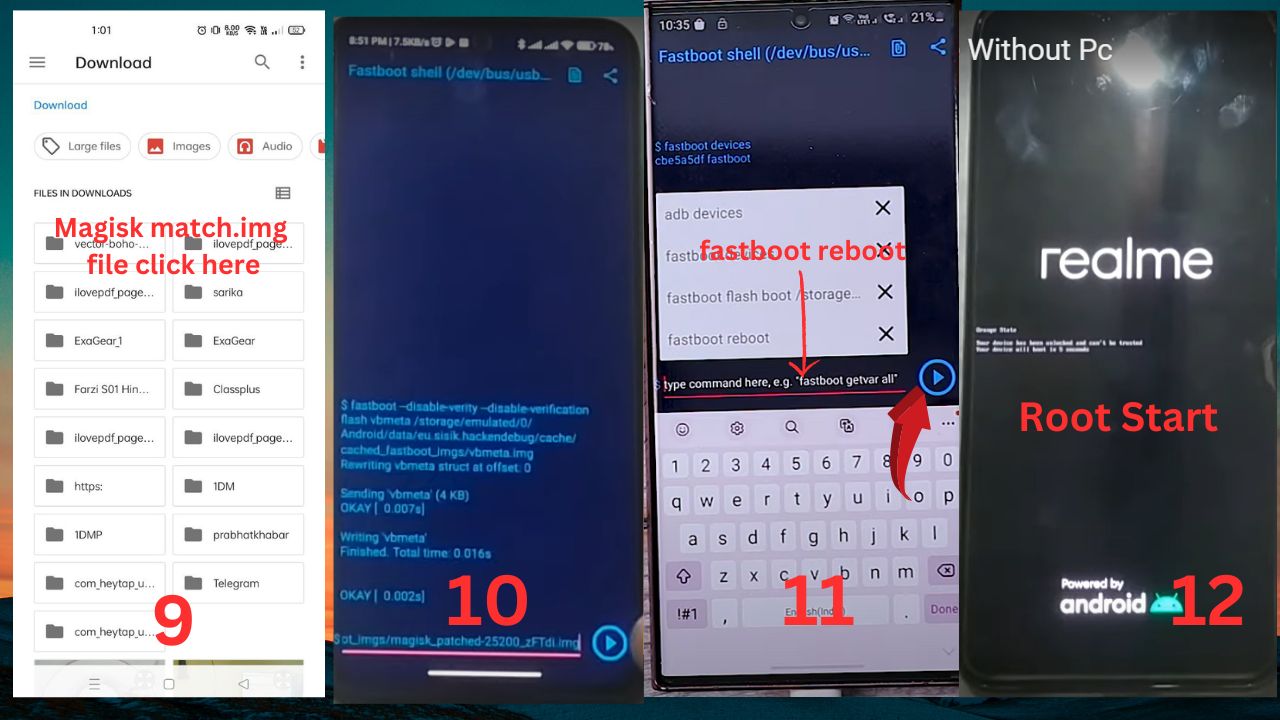
- After that, after the file is open, click on the Magisk match.img icon and then click on the play icon After that type fastboot reboot and click on the play icon Next step 12 Pro+ device root will start
- After 5min will be rooted After this, after opening the Magisk app, you will check that the version of the Magisk app will be written
- Will notify you once the device is rooted
How to root 12 Pro+ step-by-step
Rooting a 12 Pro+ phone without a computer is a bit tricky process as compared to using the computer. This usually involves installing special apps and using one-click root methods.
Conclusion
There are many ways to root a 12 Pro+ phone, but the easiest way is to use a rooting app.
There are many processes that can be used but they are a bit difficult and none work that much better overall this is the easiest way to root 12 Pro+ phone
| Magisk app Download Apk | Click Here |
| bugjaeger app Download | Click Here |
Thank you for visiting androidcharge.com. We look forward to mentioning the desired outcome or engagement and being a valuable resource for you.